My Lab

About This Space
No description provided.
Last updated on March 14, 2019
Forked from: /profound-logic/guided-lab/
Public Permissions: View Open/Fork Run Comment
NodeRun Guided Lab
This lab walks you through building a series of Node.js applications that work with employee data.
To view this document in a separate browser tab, click here.
Agenda
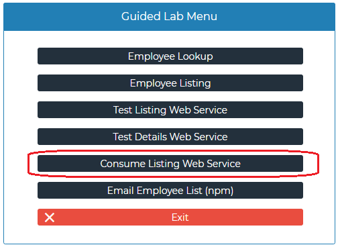
You will use NodeRun.com to build the following modules:
- Employee Lookup Module (Exercise 1, Exercise 2, and Exercise 3)
- Employee Listing Module (Exercise 4, Exercise 5, and Exercise 6)
- Employee Listing Web Service (Exercise 7)
- Employee Details Web Service (Exercise 8)
- Module to consume an Employee Listing Web Service (Exercise 9)
- Module to use npm to email an employee list (Exercise 10)
The exercises are intended to be followed in order.
What is NodeRun.com?
- Cloud environment for Node.js development
- Full IDE with Visual Designer, Editor, Debugger, and Node.js preinstalled
- Capabilities
- Design Screens
- Develop and Run applications
- Full Debugging
- Install npm Packages
- Manage, start, and stop your own Node.js Sever
- Work with Active Sessions to see end-user activity
- Hosted Database and built-in Database Explorer
- Command-line Terminal for full control of your space
- Share and collaborate with other developers
What you need to get started and complete the exercises
NodeRun.com provides all the tools you need. You just need a modern browser, such as:
- Google Chrome
- Mozilla Firefox
NodeRun Spaces
- Everyone can have their own isoldated space (or as many spaces as you need)
- Each space has:
- Its own files
- Its own database
- Its own server
- Create spaces by either:
- Visiting NodeRun.com (you can select a template or start from scratch)
- Forking another space (this is how we'll get started with this Lab)
- To save your space permanently:
- You must have a NodeRun.com account (free to create or sign in using GitHub, Google, or Facebook)
- You must then publish the space and give it a name
- You can share your spaces with others:
- Each space has its own unique URL for opening and running the space
- Set public permission on your space as you wish and invite contributors if you want together with others
Let's get started!
- Visit https://noderun.com/ide/profound-logic/guided-lab/
- Click Fork... on the Home Menu
- If you are not signed in, Create an Account or Sign In
- Give your space a name. For example: My Lab
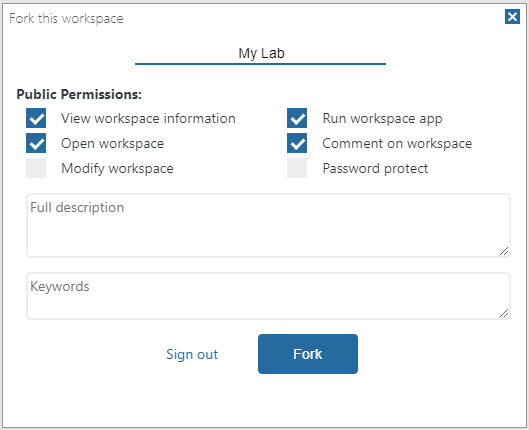
- Click Fork
- Click Close
- Notice the URL in your browser will change to show your profile name and your new workspace name
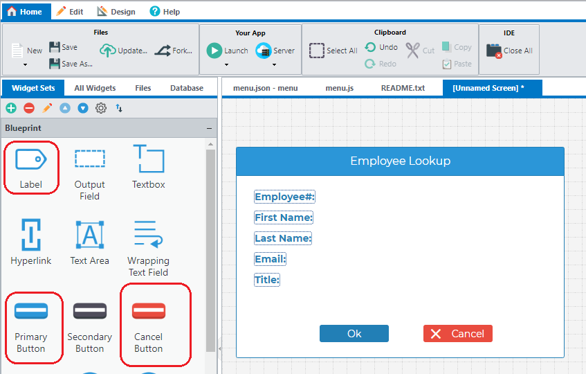
Exercise 1 (Employee Lookup)
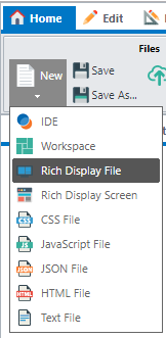
- Select New -> Rich Display File
- Add Panel
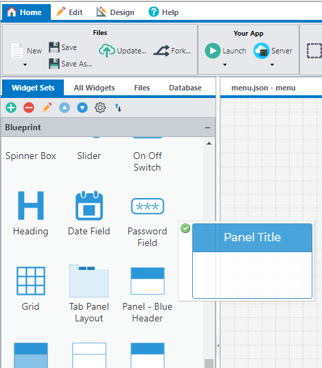
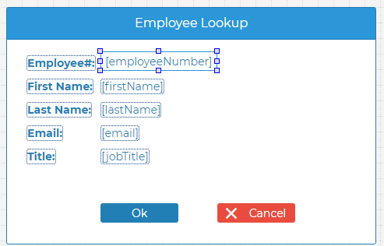
Build Employee Lookup Screen
- Add labels
- Add Ok and Cancel buttons
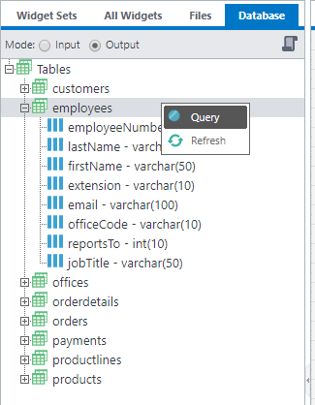
Find employee database table
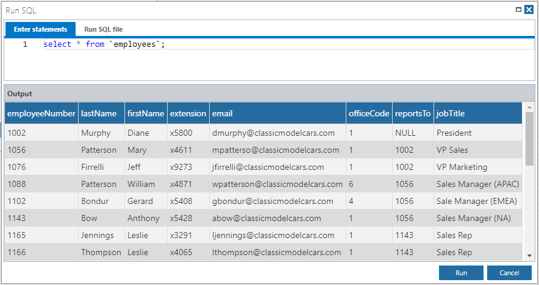
- Find employees under the Database Tab
- Review the data
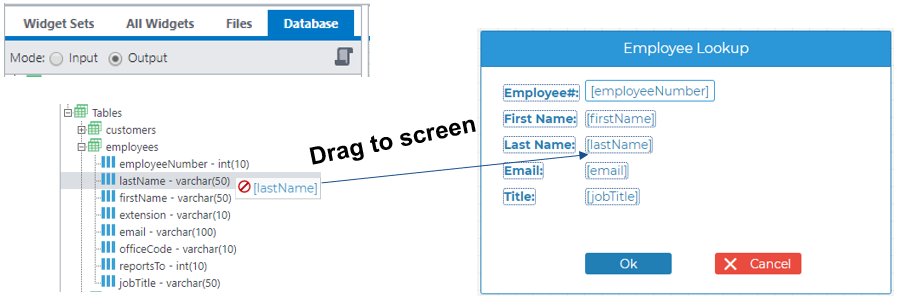
Use employee database table
In Input Mode, drag employeeNumber to screen

In Output Mode, drag lastName, firstName, email, jobTitle to screen
Bind Buttons
- Bind response of Ok button to ok
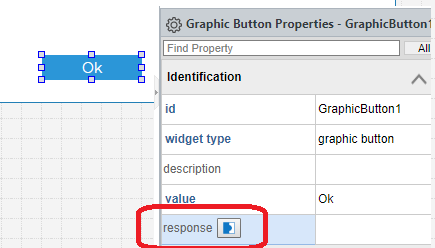
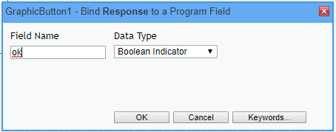
- Similarly, bind response of Cancel button to cancel
The case of the field names matters. "ok" is not the same as "Ok".
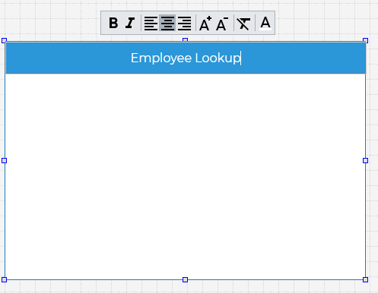
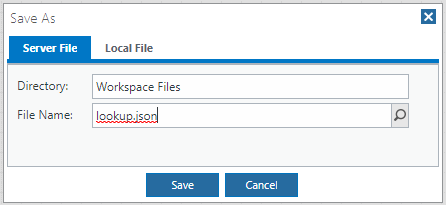
Name your screen + Save
- Click the Edit Name icon under Screens and type lookup
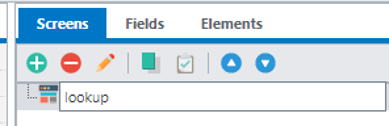
- Click Save and name the file lookup.json
Create Node.js script for Employee Lookup
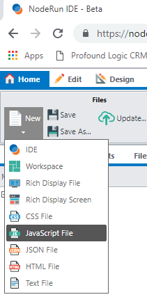
- Select New -> JavaScript File
- Write code as shown below
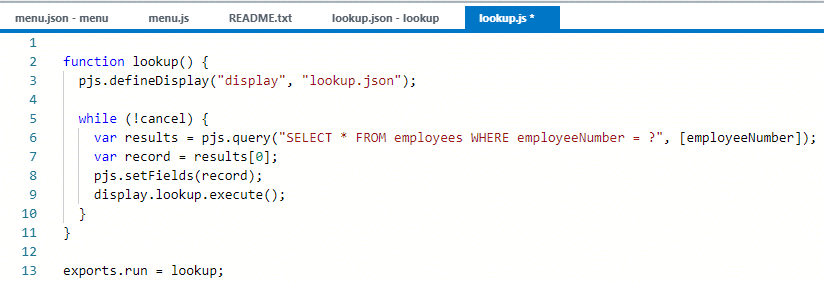
Code Explained
exports.run = lookup
- In Node.js, every public function must be exported
- In NodeRun, the name run indicates the main function to run when this script is executed
pjs.defineDisplay("display", "lookup.json");
- The pjs.defineDisplay() API declares a Rich Display File and all of its fields within the function
- The first parameter ("display") becomes an object that contains all Rich Display screens as properties
- The second parameter ("lookup.json") refers to the Rich Display json file
display.lookup.execute();
- display is the Rich Display File object
- lookup is the screen name
- The execute() method sends the screen to the browser, waits for the user to respond, and reads input from the user
while (!cancel) {
  // ...
}
- Keeps executing while the Cancel button is not pressed
- cancel is a field bound to the response property of the Cancel button
pjs.query("SELECT * FROM employees WHERE employeeNumber = ?", [employeeNumber]);
- The pjs.query() API executes an SQL query and returns a JavaScript array of records
- The first parameter is an SQL statement where ?’s are parameter markers
- The second parameter is an array of values to use for the parameter markers
var record = results[0];
- The SQL query expects only 1 record, so we retrieve the first record
- In JavaScript, arrays start with index 0
pjs.setFields(record);
- The pjs.setFields() API assigns fields from a JavaScript record or object to any field defined in your Node.js script, including fields defined with pjs.defineDisplay()
- It's a quick way to move queried data directly to the screen
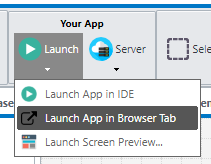
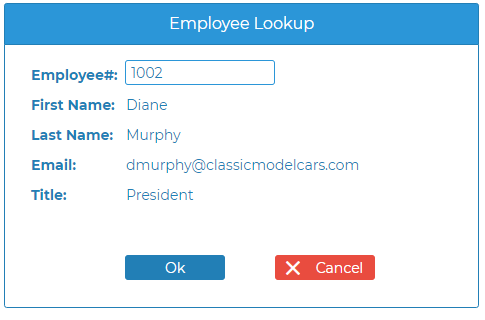
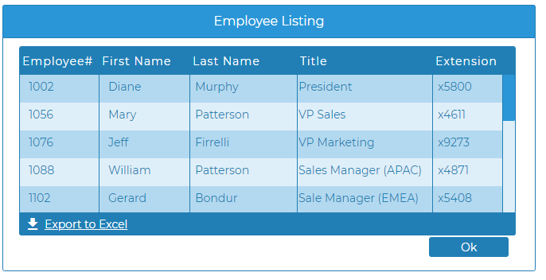
Try your application
- Select Launch App in Browser Tab
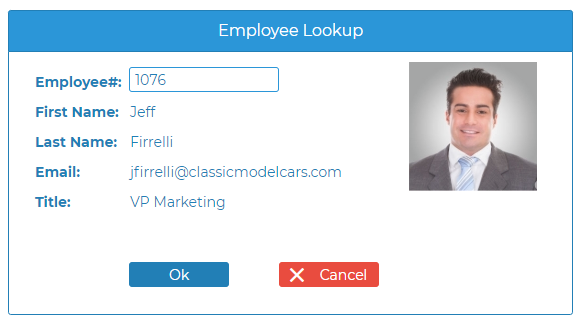
- The running application will look like this:
Exercise 2 (Using database-driven auto-complete)
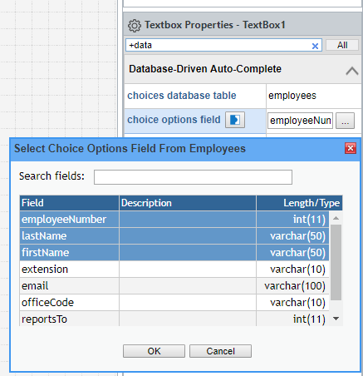
- Switch back to the Visual Designer and select the employeeNumber textbox
- Type +add under Find Property
- Type employees in the choices database table property
- Select the first 3 fields for the choice options field property and press OK
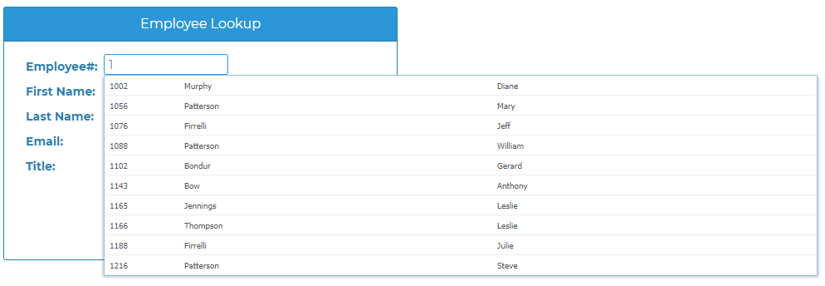
Try using the auto-complete feature
- Refresh (or exit and relaunch) the application
- Then start typing a value in the Employee# box
Exercise 3 (Adding a dynamic image)
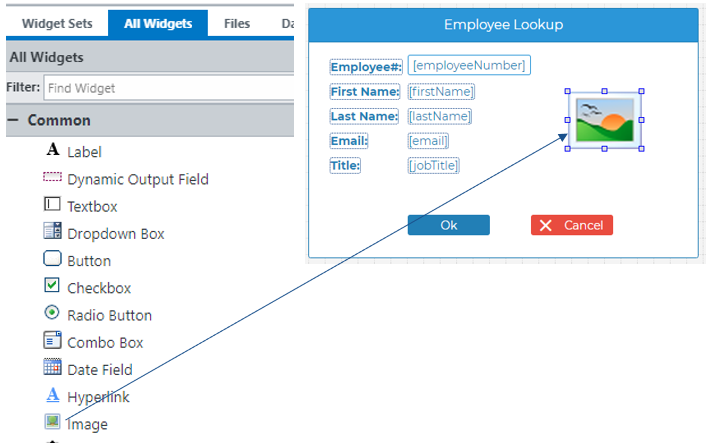
In this exrecise, we'll add an employee photo to the Employee Lookup screen.
Add employee photo as Image Widget
Drag image widget to the Visual Designer canvas:
Bind the image source property to the field name source
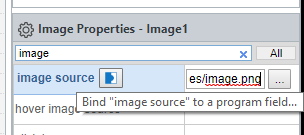
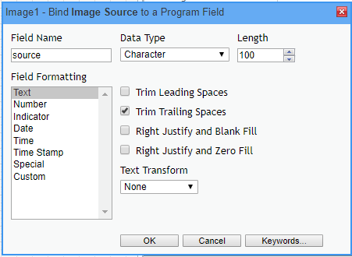
Assign employee photo source field
Add the following line of code:

Test employee photo feature
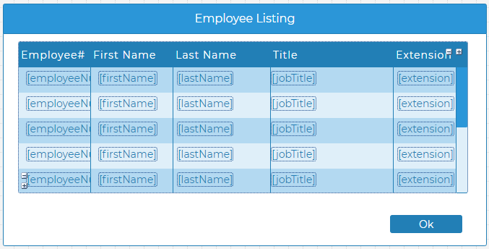
Exercise 4 (Employee Listing)
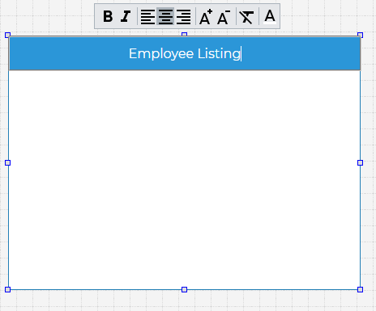
- Select New -> Rich Display File
- Add Panel
Add Grid and Ok Button
- Drag grid widget to the canvas and drag a button to the canvas
- Add columns by click the plus (+) sign on the grid widget
- Rename columns by double-clicking each column
- Drag database fields into the first row of the grid
- Doubel-click to change the button text to "Ok", then bind the ok field to the response property of the Ok button
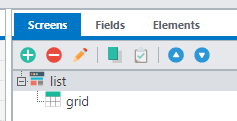
Name screen and grid; then save Rich Display File
Screen must be named list, and grid must be named grid
Rich Display File should be named list.json

Create Node.js script for Employee Listing
Select New -> JavaScript File
Write code as shown below
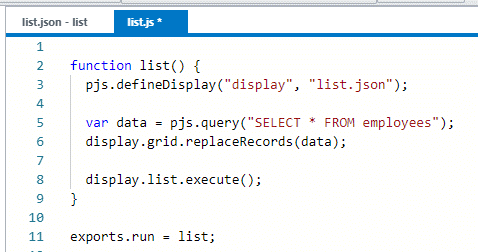
Save as list.js
Code Explained
display.grid.replaceRecords(data);
- display is your Rich Display File object
- grid is the name given to your grid on the screen
- The replaceRecords() method replaces all records in the grid with an array of records passed in as a paramater
- NodeRun supports a variety of methods to populate grids
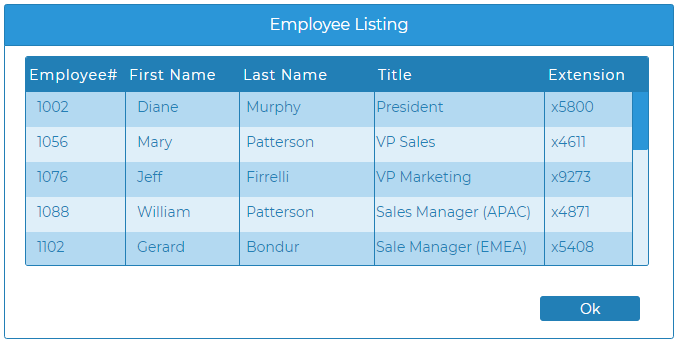
Try running Employee Listing option from Menu
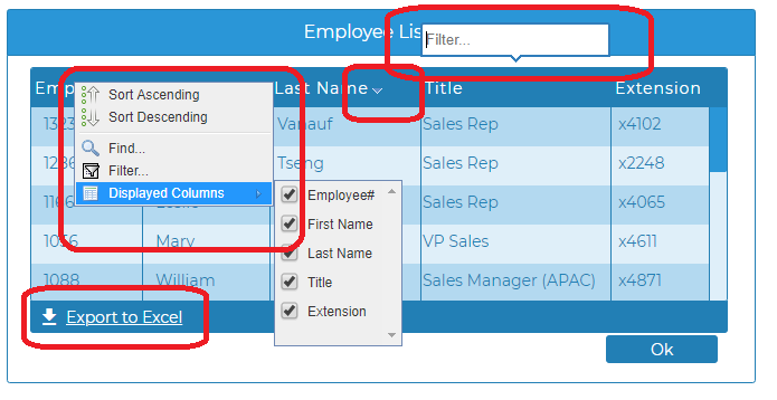
Exercise 5 (Enhance the grid)
In the Visual Designer, select the grid and set the following properties to true:
- sortable columns
- movable columns
- xlsx export
- find option
- filter option
- hide columns option
Save, then rerun the Employee Listing to test out the features
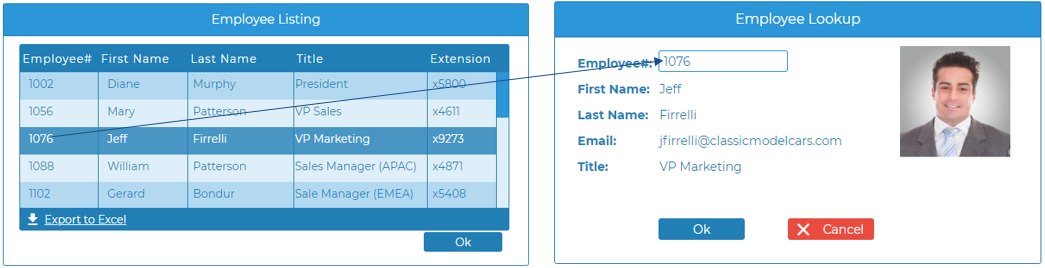
Exercise 6 (Connect listing to lookup)
This exercise allows users to click on an employee in the grid to see employee details.
Configure row selection
Set the following grid properties:
row selection: single
selection field: Bind to a boolean named selected

Add call from list.js to lookup.js
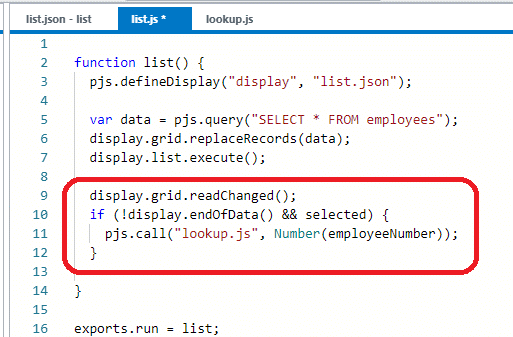
Code Explained
display.grid.readChanged();
if (!display.endOfData() && selected) {
  pjs.call("lookup.js", rec.employeeNumber);
}
- The readChanged() method reads the grid for changed records one at a time and populates display fields from the records found
- display.endOfData() returns a boolean value of true if no changed records were found
- selected is the boolean field we used to identify whether a specific record is selected or not
- pjs.call() calls another script or program
- Number() converts a delcared strongly-typed field to a primitive JavaScript value, which forces the employee number to be passed by value rather than by reference
Alternate approach
There are multiple ways to retrieve record data from a grid.
Using ES6 syntax, we can quickly retrieve all selected records into an array and then use the first record in the array.
var selectedRecords = display.grid.filter(entry => entry.selected);
var record = selectedRecords[0];
if (record) {
  pjs.call("lookup.js", record.employeeNumber);
}
selectedRecords[0] works well because single selection only allows one record to be selected at a time.
Modify lookup.js to receive parameter
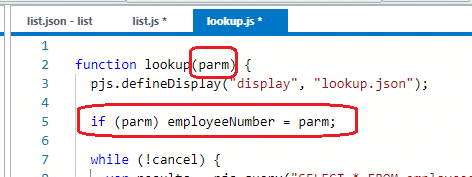
Code Explained
if (parm) employeeNumber = parm;
- Checks if parm was passed, and if so, assign to employeeNumber as default value
- If we don't check for the existence of the parameter, a data decimal error may occur
Test connected modules
Exercise 7 (Listing Web Service)
Select New -> JavaScript File
Write code as shown below
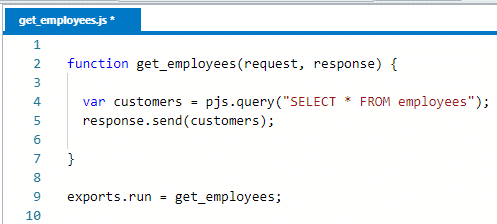
Save as get_employees.js
Code Explained
function get_employees(request, response) {
  // ...
}
NodeRun uses the popular Express.js web framework as its foundation. All Express.js Web Services receive a request and a response parameter.
- request is an object that represents everything about the Web Services request
- response is an object that supplies the methods you need to constuct and send a response
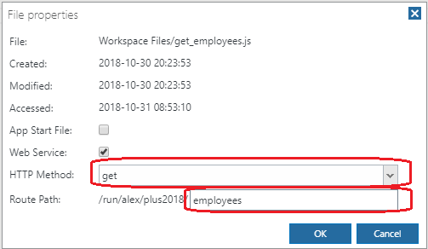
Create Web Service out of get_employees.js
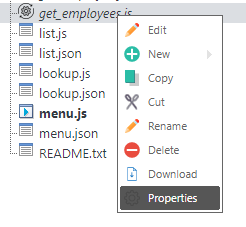
Right-click the saved file under Files and select Properties:
Then select the following:
- Web Service
- HTTP Method: get
- Route Path: employees
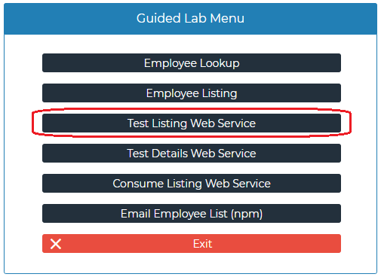
Test Listing Web Service
Exercise 8 (Details Web Service)
Select New -> JavaScript File
Write code as shown below
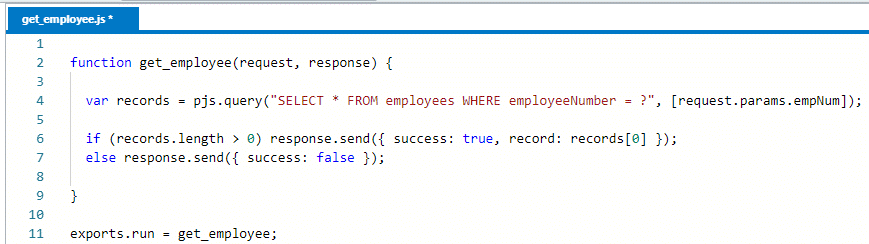
Save as get_employee.js
Code Explained
var records = pjs.query("SELECT * FROM employees WHERE employeeNumber = ?", [request.params.empNum]);

if (records.length > 0) response.send({ success: true, record: records[0] });
else response.send({ success: false });
- request.params allows you to access parameters passed as part of the URL
- Other types of request parameters can be accessed as well
- request.query gives you query string parameters
- request.body gives you POST data parameters
- records.length specifies how many record were retrieved; if 0, we send a
{ success: false }response
Create Web Service out of get_employee.js
Right-click the saved file under Files and select Properties:
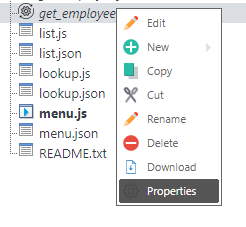
Then select the following:
- Web Service
- HTTP Method: get
- Route Path: employee/:empNum

Test Details Web Service
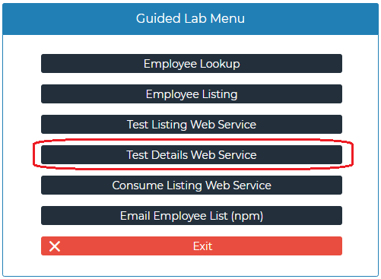
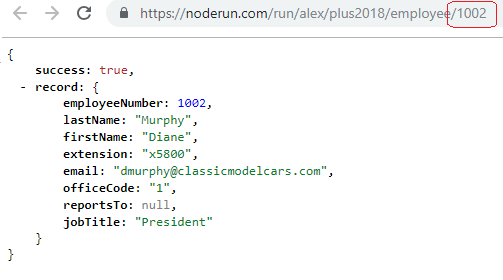
Try modifying employee number in the URL.
Exercise 9 (Consuming a Web Service)
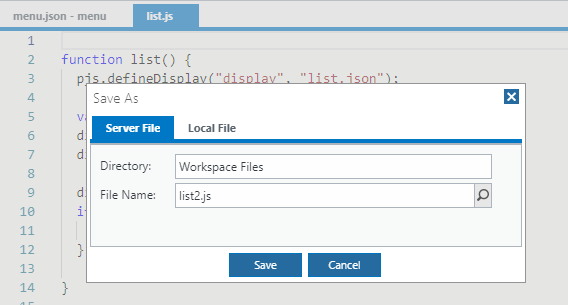
Open list.js
Save As list2.js
Call a Web Service
Replace:

With:
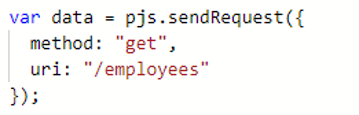
Code Explained
- The pjs.sendRequest() API makes a Web Services request
- The URI can be specified as relative or absolute
- The data is now requested from a Web Service instead of connecting to the database directly
Test Consuming a Web Service
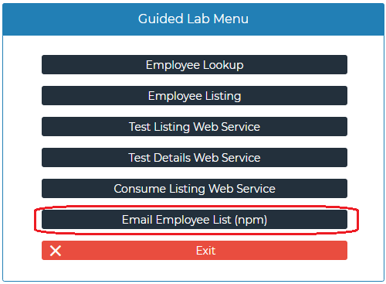
Exercise 10 (Using npm to email Employee List)
In this exercise, you will write code to email a list of employees to yourself.
Install gmail-send npm package
You can install pacakges from the Server menu:

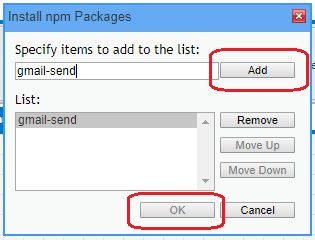
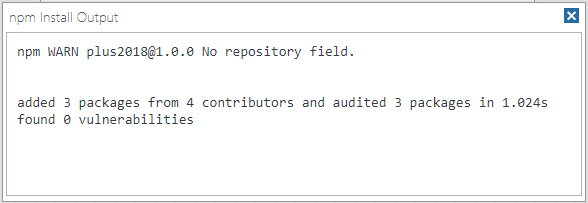
Alternatively, use the Terminal feature and type: npm install gmail-send
What is npm?
- www.npmjs.com hosts a repository of reusable Node.js packages
- There are many packages for almost every imaginable purpose
- Packages will often use other packages
- For example, nodemailer is popular package for sending emails
- gmail-send is a package that implements nodemailer, but simplifies usage specifically for sending emails from a gmail account
Create Node.js script named email.js
Select New -> JavaScript File
Write code as shown below
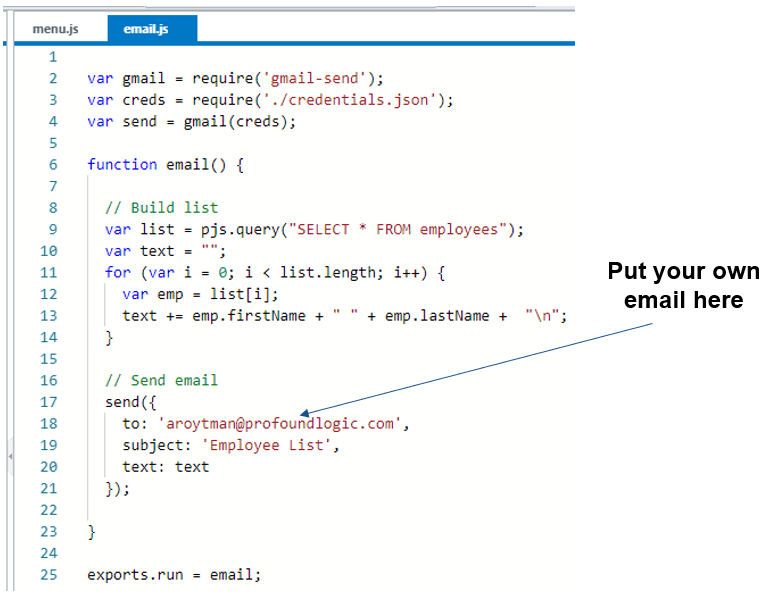
Save as email.js
Code Explained
- require() is a Node.js API that loads files or loads installed npm packages
require('gmail-send')loads the gmail-send packagerequire('./credentials.json')loads gmail account credentials from a json file
Test the email functionality
- Don't click the option more than once! The menu will remain on screen after the email is sent.
- Check your inbox to see if you received the employee list.
You are all done! Thank you!
Thanks for trying out this lab!
As a next step, try to think of creative ways to enhance the screens and/or the funcionality behind the screens you built.
Leave questions or comments for us here: https://noderun.com/view/profound-logic/guided-lab/

Be the first to comment:
Comments